


Visual Studio Code (VS Code) is my favourite code editor, even though I haven't tried all the possible code editors out there, I can say VS Code is my best 😊. In this article, we'll go over 4 features this great editor has, which make it just right, to speed up productivity and a lifesaver at best.
1. Searching Capabilities
The search feature is just amazing in VS Code and there are several modes of searching too, we could search for files, symbols (which means variable names, function names and so on), references, etc. but let's go over the 3 search features I mostly make use of.
1a) Command Palette (Ctrl+Shift+P)
The Command Palette allows you to have all the functionalities of VS Code in one place. Functionalities such as all GIT commands (like push, pull, etc.), reloading the window, and so on can be accessed from the command palette, but that's not all.
The command palette gives room for many commands, but let's go over just one, which allows us to navigate the various files in the codebase, by their file names or symbols. To work with the navigating feature, the command is Ctrl + P.
And when the command Ctrl + P is typed, the interface appears like the image below, and of course, shows your files in your codebase, allowing you to jump through files quickly.
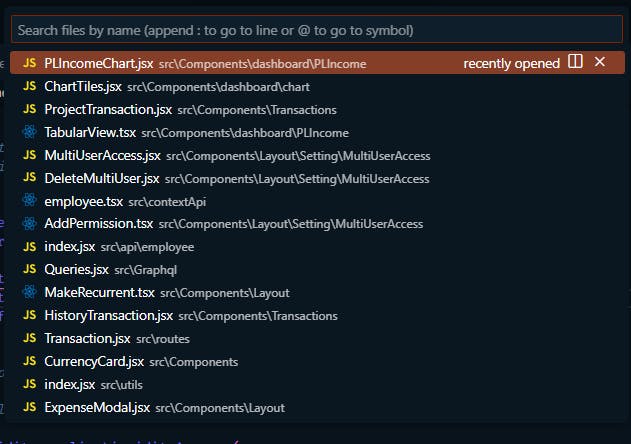
Bonus trick, you could press the command Ctrl + P multiple times, to navigate down through the files showing on the command palette. In the case of the image above, if Ctrl + P is typed again, the file ChartTiles.jsx will be selected. Then to up the files, you can make use of Ctrl + Shift + P provided, you were on the navigating palette.
To view all other amazing commands you have access to using the command palette, please visit Visual Studio Code User Interface
1b) Search on Activity Bar (Ctrl + Shift + F)
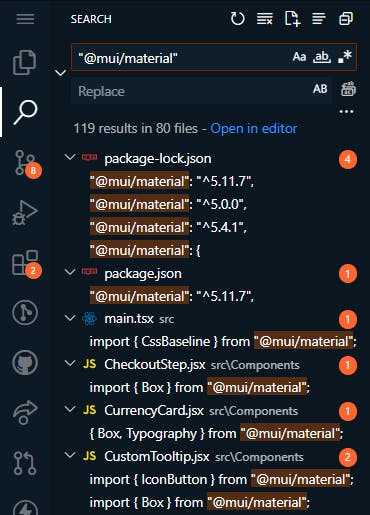
The Search on the Activity Bar is pretty powerful, as well, it allows you to search and replace words across the codebase. So if you're looking for every occurrence of some symbol or string for example "@mui/material" in the codebase, you could just search for it.
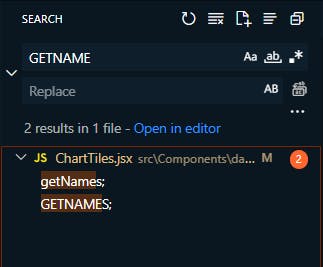
This search feature is even more powerful especially when you want to find something really specific, like every occurrence of the symbol or variable name for example getNames.
From the image below, you can see the word GETNAME is searched and it's capitalised, yet the result isn't case-sensitive.
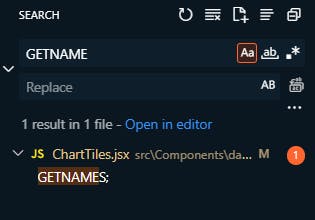
To make it case-sensitive or in any other case, search accurately to what is actually being searched for, that's where the three options provided come into play, which are Match Case (Alt + C), Match Whole Word (Alt + W), Use Regular Expression (Alt + R).
From the example above, we care about the case, so we can select Match Case (Alt + C) to be precise.
If by chance, you don't what's the Activity Bar, please visit here: Activity Bar | Visual Studio Code Extension API
1c) Search by Reference (Shift + F12)
The search by reference or as named in VS Code, Go to Reference comes in handy when you want to quickly just see all occurrences of symbols or words across your codebase or the current file opened.
For example, let's say you've made use of the useState hook from React, in multiple places in a file and you, want to jump over to every reference of the hook in your file. While the hook, useState is selected, you could either right-click on the word and select Go to Reference or use the shortcut Shift + F12. Doing so you get something similar to the image below:
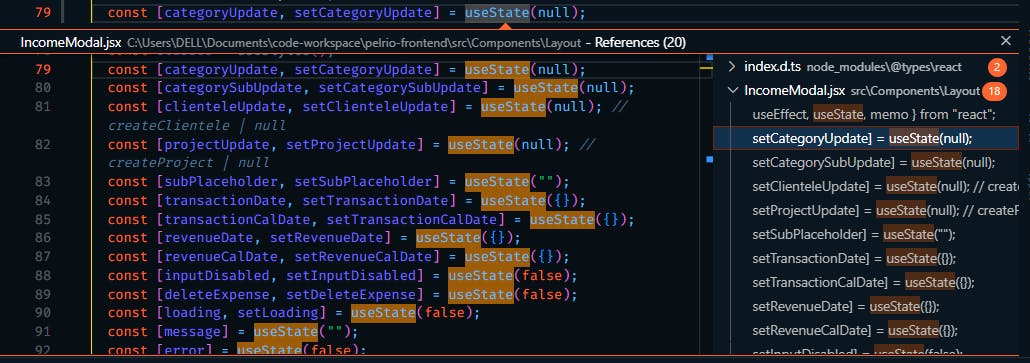
The file currently opened is named IncomeModal.jsx so that is why it shows on the left-hand side of the pop-up, but take note of the other file there, the index.d.ts file which is in the node_modules directory. The index.d.ts file shows because the useState hook is coming from the definition in the index.d.ts file.
Quick note, in my use case, I don't care about the
index.d.tsfile and I don't know how it really works😅 but I think there's a reference to theindex.d.tsfile. All I care about is jumping around where I have theuseStatehook in my current file.
Now, there's another cool feature with the Search by Reference worth mentioning that brings the power of reference. Let's go over another use case.
For example, let's say you've made a custom hook in React or you're using some library that has its custom hook and you want to search for every reference to the custom hook. Then again, using the shortcut Shift + F12 you can see every reference of the hook and in most cases, if used in multiple files you'll see that too.
From the image, below, I made a search by reference for the useTranslation hook, and it's being referenced in 213 files.
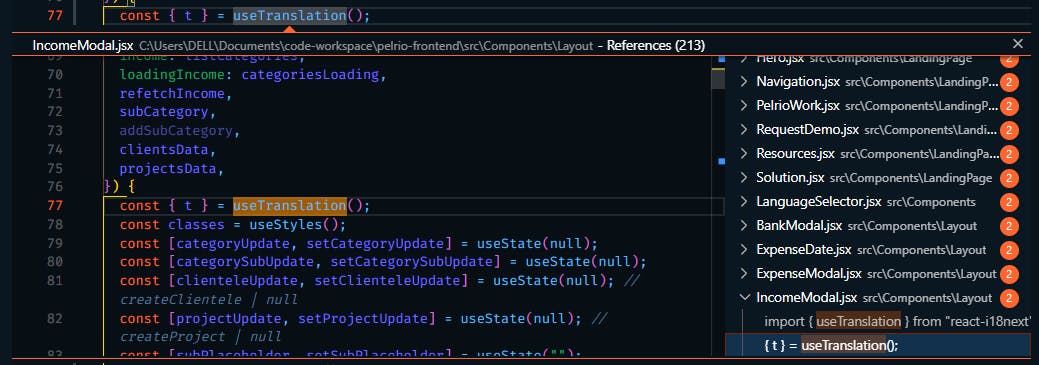
The Search by Reference feature is kinda similar to the Search on the Activity bar, but then they are very different, so you can choose which to use.
2. Rename Symbols (F2)
Rename Symbols is just mind-blowing 🤯 (I might be overemphasising but it's a cool feature). This feature allows you to rename a symbol (again which could be a file name, function name, variable name, etc) across multiple files. So you can rename a variable name and be certain that all references to that variable name will be changed as well.
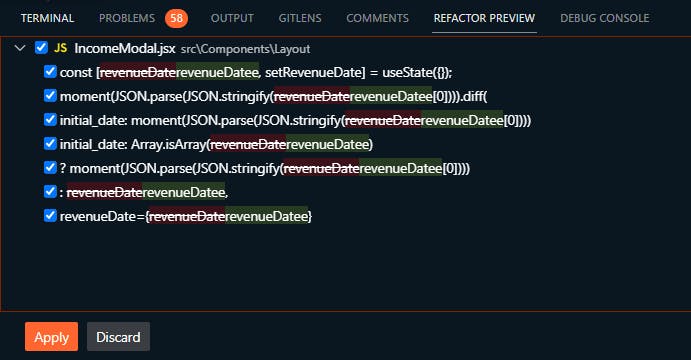
For example, on a file, let's rename the state name of the useState hook to something else. In the image below, I'm renaming the state revenueDate to revenueDatee, now everywhere where revenueDate was used will be changed to revenueDatee.

Quick note, to see all the occurrences of the state changing, type Shift + Enter, which opens the Refactor Preview and shows what would be removed and replaced. If you're happy with it, click Apply else Discard.
3. Source Control with Git (Ctrl + Shift + G)
The Souce Control in VS Code allows the ease of just clicking on some buttons and all your GIT operations will be done for you without writing a single command. The Souce Control view can be accessed on the Activity bar, or with the shortcut Ctrl + Shift + G.

I wrote an article about source control in VS Code: VS Code Version Control: Understanding the basics of Git operations # 1, you can read it to know how it works.
Also, please the VS Code docs are extremely helpful, here's all the Source Control with Git in Visual Studio Code.
4. Multiple selections (multi-cursor)
Multiple selection is a feature that allows you to place your cursor in multiple locations on a file, and then give room for editing where the cursor has been placed. The most common way of using this feature is when you have similar text all around a file, and you'll like to change the text to something else.
Looking at the image below, you'll see the text 200 is changed to 120 at the same time.
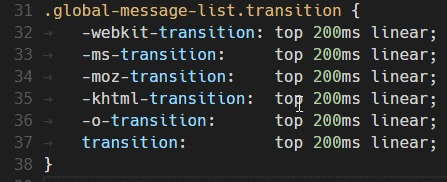
The above image is from VS Code docs
There are different commands in VS Code that'll aid you to make sure of the Multiple selection feature, but the most common command, at least the one I use often is Ctrl + D, which selects the next occurrence of some text or symbol selected, and adds multiple cursors.
There are other commands that could multi-select in a different scenario, mostly when the texts aren't similar, but please go through the docs to find out more.
Conclusion
There are several other features in VS Code not covered in this article and it will be an endless article if we were to go over all of them. So, I'll advise you to go through VS Code documentation more frequently or at least subscribe to their YouTube Channel, their shorts are very helpful.
Hopefully, you've learnt a new feature in VS Code, and if you already make use of all these features, you're a PRO 😅. By the way, if you know of any feature that helps you a lot while coding, please drop it in the comments.
Thanks for reading and see you in the next article!